Learn how to make a stitched mixed media mini-journal that tells a visual story.
Stitched visual journals that tell a story are one of my favorite types of journals to make. Instead of telling a written story using only words, a stitched visual story unfolds using fabric and stitches, personal symbols, and images with a few selected words that have special meaning.
Although stitched journals are fun to make, large journals can take quite a long time to complete. If you’re short on time, or have not yet discovered visual story journals, then this stitched mini-journal is the perfect way to get started.
Mini-journals on the other hand, go together much more quickly than larger journals. Plus they’re fun, creative, and easy to make. They don’t take up a lot of time or space, and they can tell a visual story in only a few pages.
Express Yourself
Stories that are ideal for visual journals are stories that come from deep inside. These types of stories are usually ones that we feel or are emotional about and are things that we might find difficult to express in words. Although writing in a journal is one way to deal with our feelings, making visual story journals is more artistic and much more fun and creative.
Using stitched visual journals we can express our joy and happiness, as well as our sadness, using fabric and stitch as well as other mixed media elements to tell the story on the pages of our journal. Creating these mini-journals is a process, and with each new mini-journal the process will be different and stories will emerge that reveal a little more about ourselves. Perhaps it’s a whole new story, or maybe it’s an old story told in a new and different way.
These instructions will guide you through the process of making a beautiful stitched mixed media mini-journal that is creatively assembled. Through the use of thoughtful self-exploration and contemplative stitching, you can create something beautiful that holds personal meaning for you.
Contents
Mini Journal Flip Through
Mini-Journal Overview
Theme
When making a mini-journal that tells a story, the first thing to do is to select a theme or a topic. Working with a theme gives you a starting point for a story and it also helps to provide a focus for your thoughts as you’re stitching.
Assembly
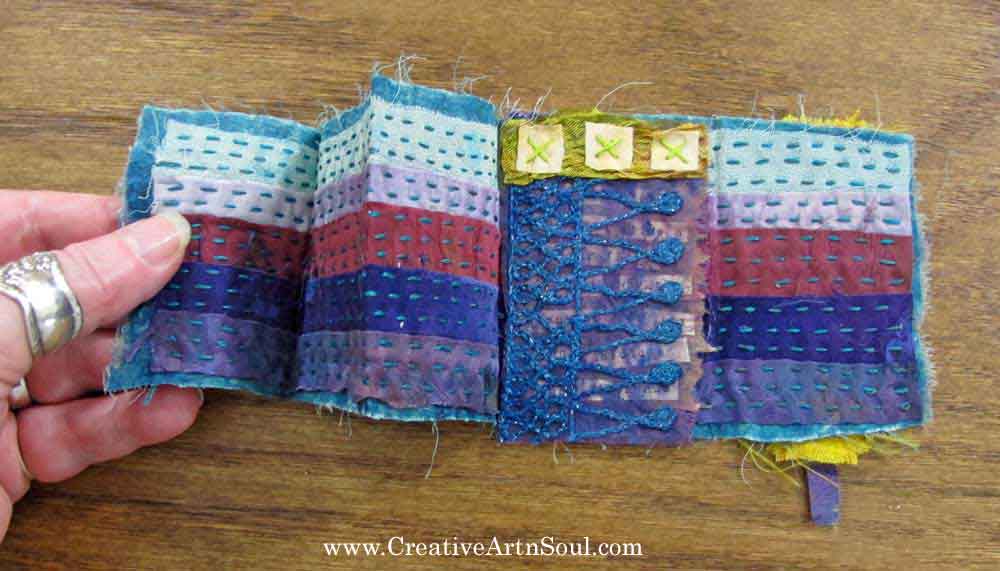
The mini-journal is made from a piece of paper which is folded in half to create a small booklet with four pages, although you could add more pages if you choose. You can make your pages any size at all although I like to make mine about 2-1/2″ wide x 4″ high.
Each page holds an individual fabric collage section which is glued to the paper pages. The fabric collage sections should be made slightly smaller than the pages.
Working Intuitively
When making stitched journals, it’s best to work intuitively. Working intuitively means working without a design or plan, and allowing the process to flow with ease. Essentially it means giving up control, and getting quiet enough in your head and body so that you can sense whether the work you are doing is pleasing or not. It’s a feeling that you get, like a gut feeling, or maybe a voice in your head that says something like – “Well that doesn’t look or feel quite right, let’s try something else.” or “Look at how beautiful that is.” The tricky part is learning to the trust your intuition because it’s always right. Every time.
When you work intuitively you will find much more pleasure and satisfaction in what you do. Working in this way allows you to make art that flows from your heart and soul. When you begin to care less about the outcome and more about the journey that gets you there and what you learned along the way, then you know you’re working intuitively.
Mini-Journal Supplies
Gather your supplies and place them in a small box or container. Having your supplies all in one place makes it easy for you to work on your project and you can just pick up where you left off without having to go look for things.
Images or Photos
Select an image, a photo, or even a metal charm or embellishment that best represents the theme of your mini-journal. If using a photo or image, you could print it onto fabric so you can stitch it. If you don’t know how to print on fabric, you can find information here. You could also use photos printed onto paper, or even use an image from a magazine.
Paper Journal Pages
You will need a piece of paper approximately 5″ wide by 4″ high which will then be folded in half to measure 2-1/2″ x 4″. This is my favorite size however you can make it a different size if you prefer. This paper will be used for the paper pages on which to mount your fabric sections so make sure the paper is strong enough to support the weight of the fabric. I like to use rice paper because it’s thin and strong, or khadi paper which is a lovely handmade paper. You can also make the paper pages stronger by painting them with a thin coat of gesso.
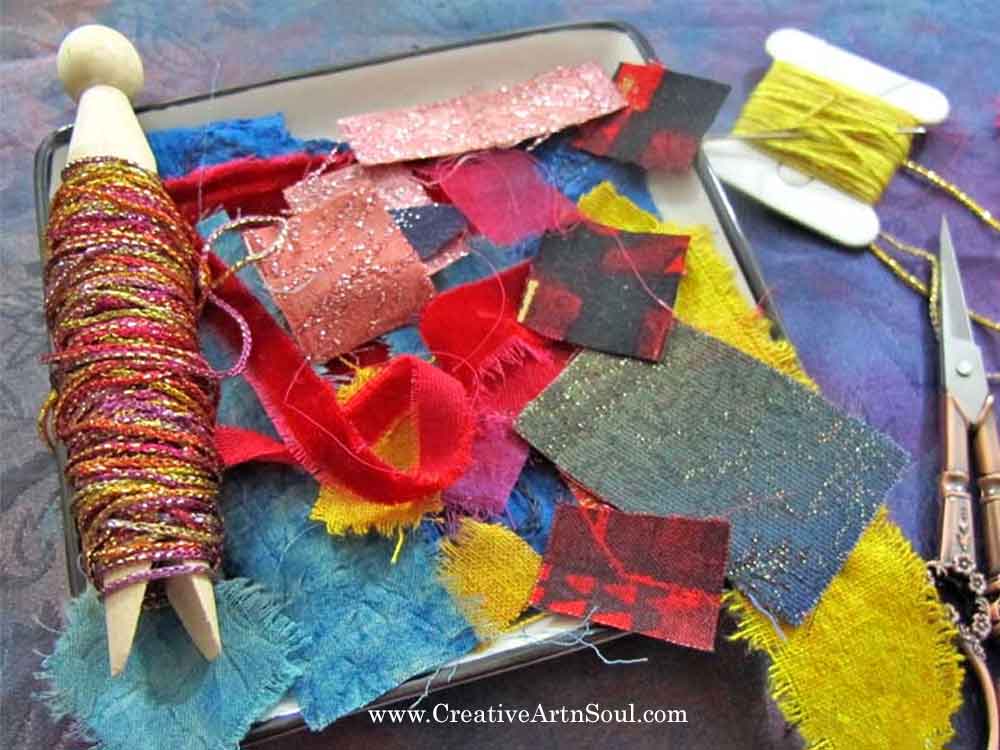
Fabric Scraps, Paper Scraps and Ephemera
Select some of your favorite fabric scraps, paper scraps or bits of ephemera. I personally love to use beautiful fabrics such as sari silk remnants.
Scraps of ribbon, lace and decorative fibers
You can incorporate scraps of ribbon, lace and decorative fibers which can be used for edgings and embellishment.
Buttons, Beads and Charms
Buttons, small beads and metal charms can also be used for embellishment. Make sure they are flat enough for use in your journal.
Embroidery thread, needles, scissors and thimble
Select a range of embroidery threads in colors to coordinate with your fabrics, along with embroidery needles to suit your threads.
Fabric glue or craft glue
You will need fabric glue, or craft glue suitable for fabric, in order to attach the fabric sections to the paper pages. My favorite glue is Craftbond Glue.
Tear-away stabilizer
Tear-away stabilizer is used as a foundation, or backing, for the stitched pages.
Mini-Journal: The Beginning
The front cover of the mini-journal is where the story begins, so it should reflect the overall theme of the journal. Using a theme provides a focus and helps to shape the story that is woven within the fabric and stitches. When creating a narrative in this way, your art becomes more contemplative, meaningful and unique.
Starting a stitched journal armed only with intuition to guide you can be daunting. It’s like staring at a blank page on a sketchbook and wondering where to begin. To make the process easier, I first like to cut or tear some small pieces of fabric into different shapes such as squares, rectangles and strips. These bits and pieces provide a starting point and inspiration.
Next, cut a piece of tear-away stabilizer to size. Then start layering and arranging the fabric scraps on top of the stabilizer until you’re happy with the arrangement. Pin or glue the pieces in place, then add some hand stitches to hold the pieces in place.
Front Cover Embellishment
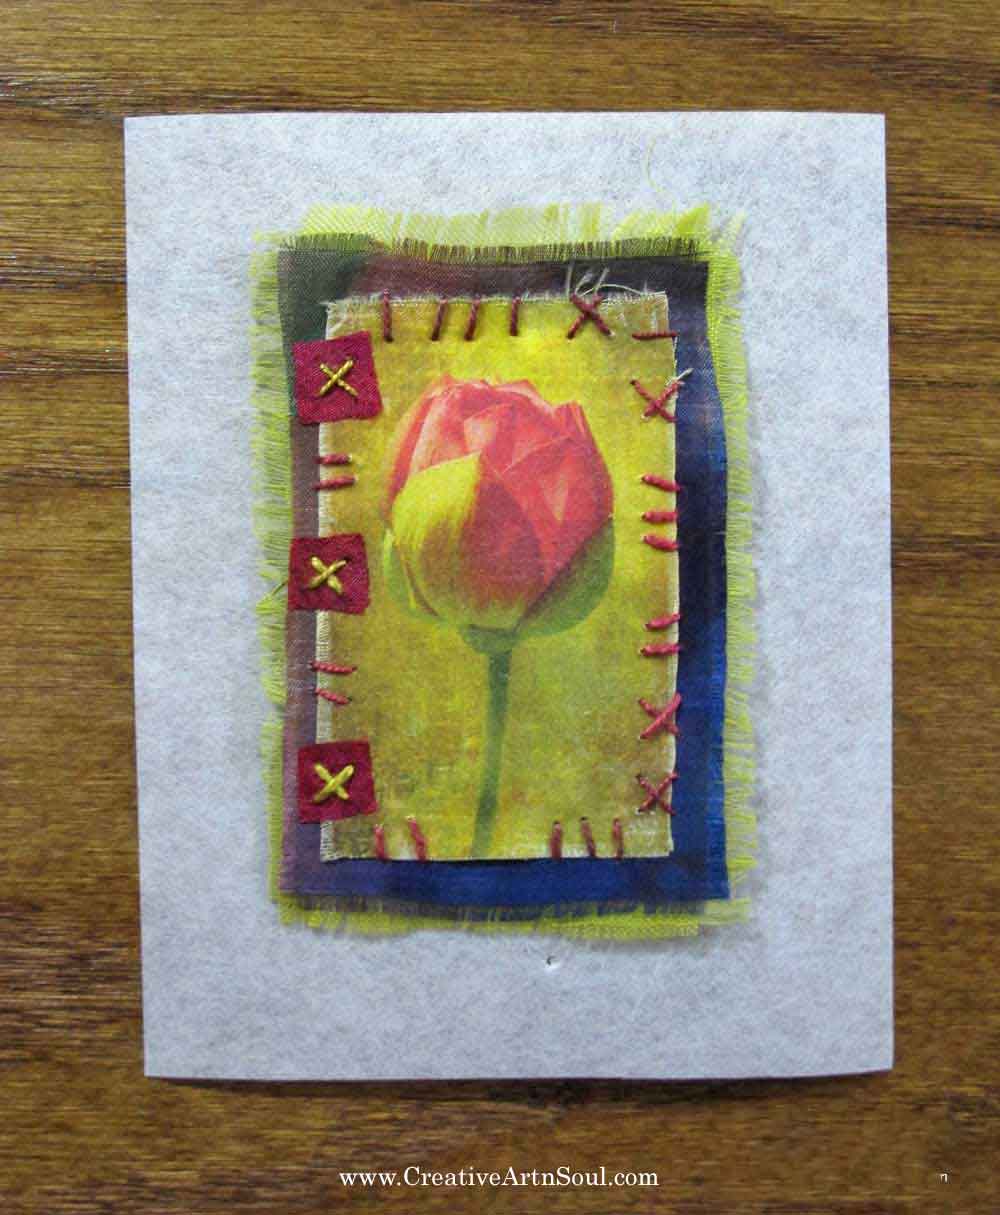
When designing the front cover, include an image or embellishment that represents the theme of the mini-journal. Then create a layout that best showcases it.
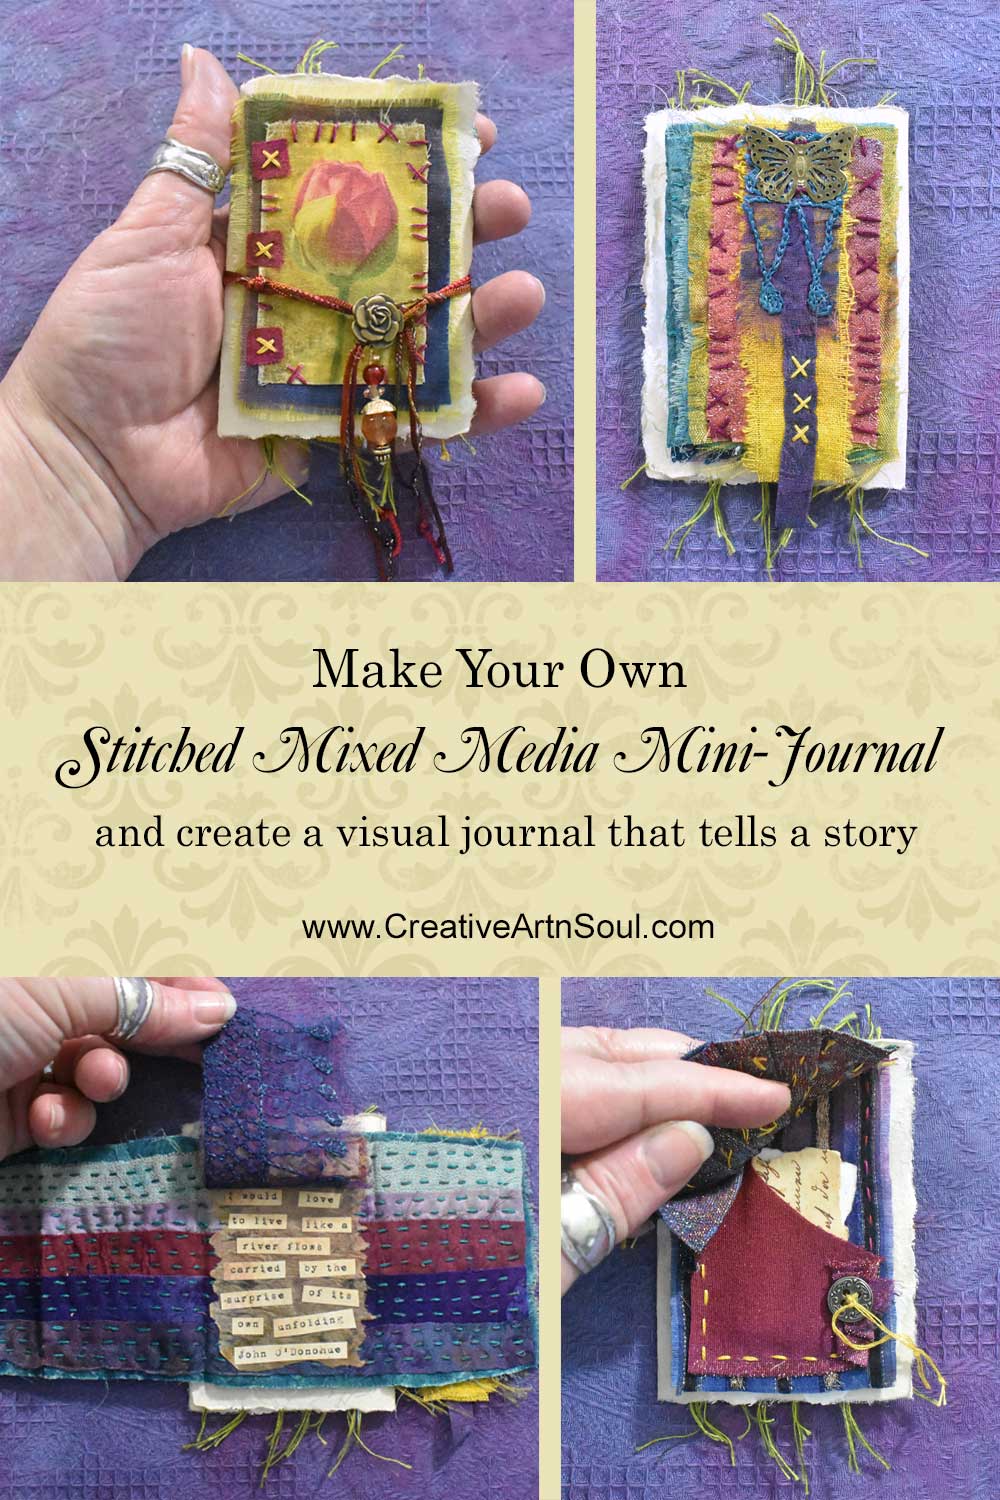
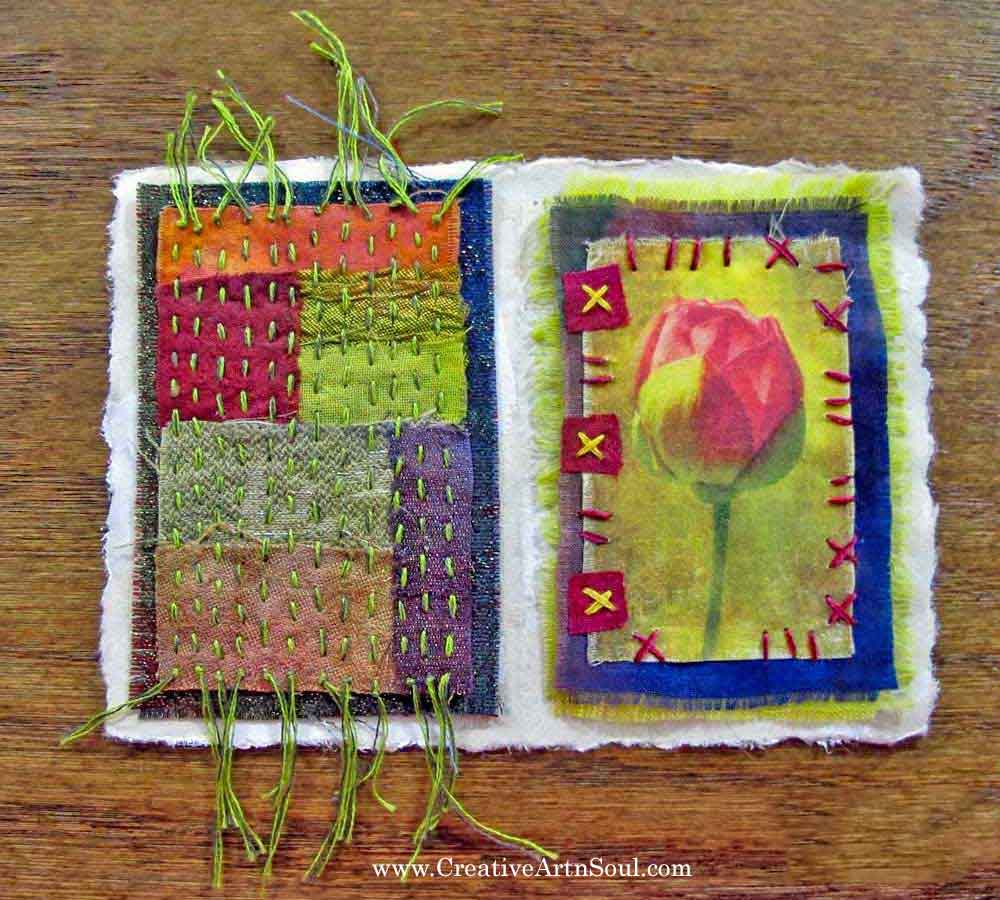
For this mini-journal I’ve selected the theme “Unfolding”. For the cover, I’m using a photo of a flower bud printed onto fabric to represent the theme. Just as a flower slowly unfolds its petals, our lives also unfold slowly over time revealing the mysterious and beautiful story that is unique to each of us.
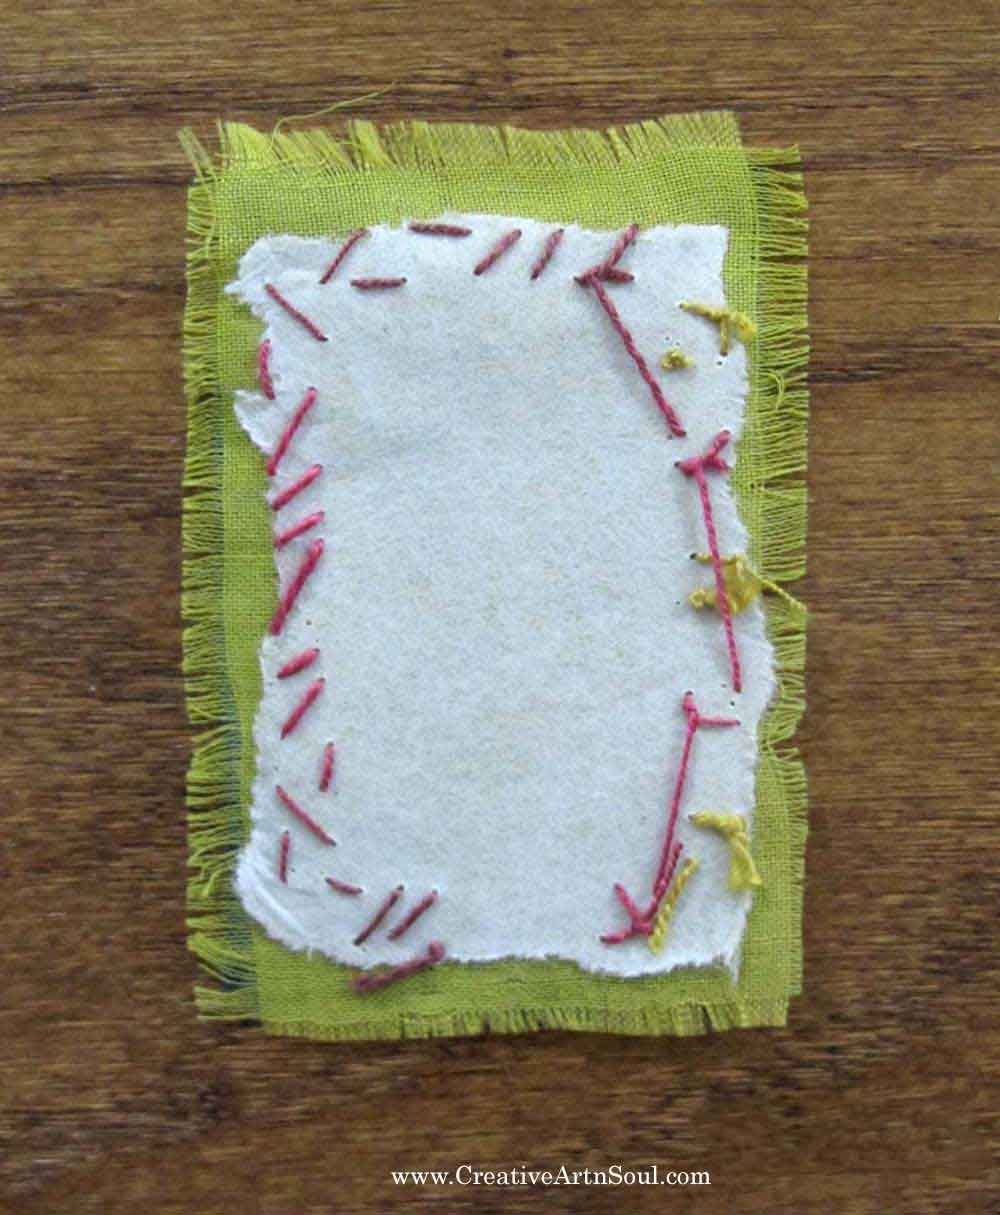
When you’re finished designing and stitching the fabric collage section, carefully remove some of the tear-away stabilizer from around the outside edges so it isn’t visible. Leave the rest of the stabilizer intact. This can be used to glue this fabric section onto the paper pages during assembly which is the final step. Each page is made using this method.
Mini-Journal: Secret Stories
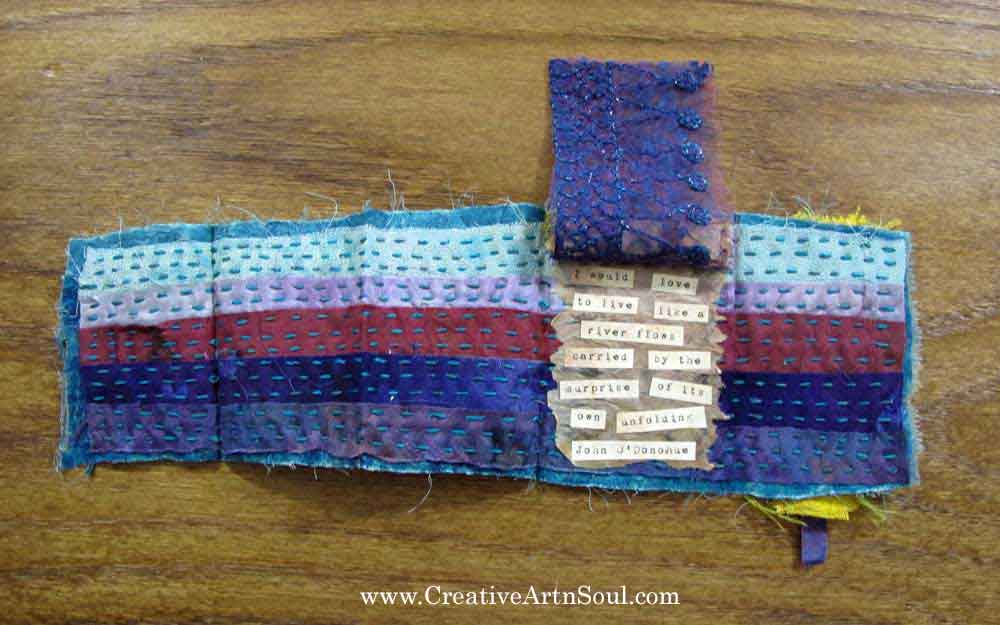
Adding words to the pages of your journal gives you the opportunity to expand on the theme and infuse deeper meaning and sentiment into your mini-journal. You could use words such as favorite sayings or quotations. Alternatively use one or two simple words that hold special meaning for you. Or you could write your own poetry or journal entry. You could display these words anywhere on the pages, however hiding the words adds a little mystery to the story.
When designing a page for secret stories, a simple method is to make the page in two sections:
- Print or write your words onto a piece of paper, then cut them out. Glue them directly onto the paper page during assembly, or onto a piece of paper such as a used tea bag which can then be glued onto the paper page during assembly.
- The fabric section should be made so that it can be lifted open either from the bottom or the side to reveal the words underneath.
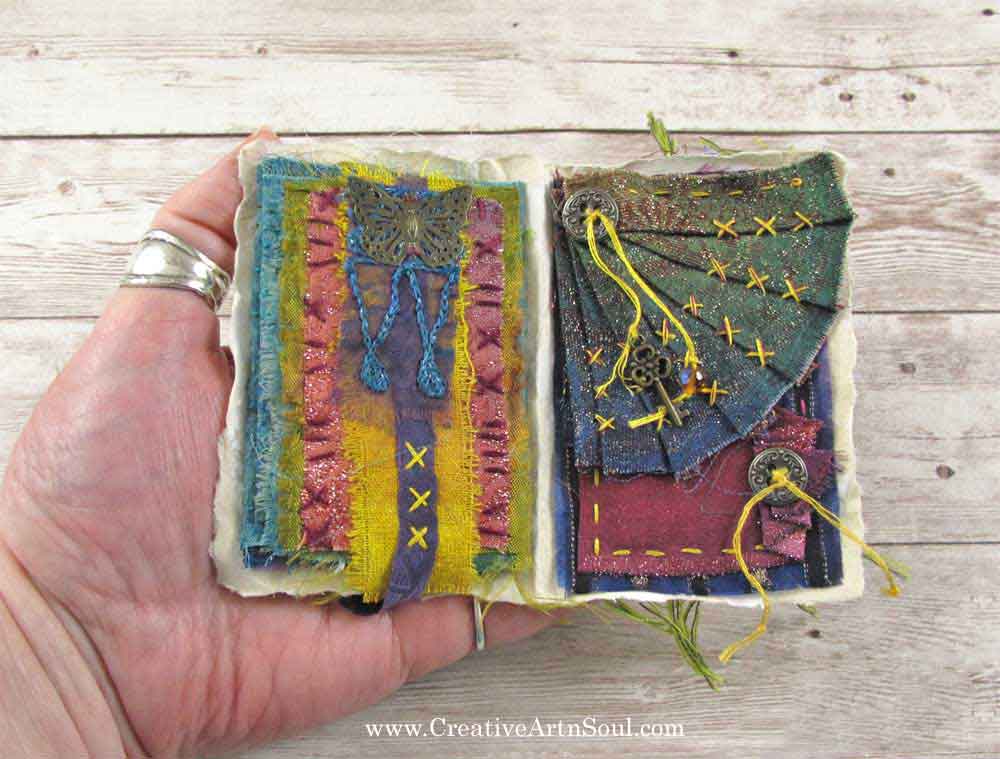
On the front of my mini-journal I made a small embellished collage with a butterfly charm. If you’ve ever seen a butterfly emerge from its cocoon you’ll agree that this is a perfect representation of a symbol for “unfolding”. In keeping with the theme, this page then unfolds to reveal my secret story which is one of my favorite quotations.
As you move deeper into the process of designing and sewing the fabric collages, you can explore how to interpret the fabric and stitches in a way that reflects your story.
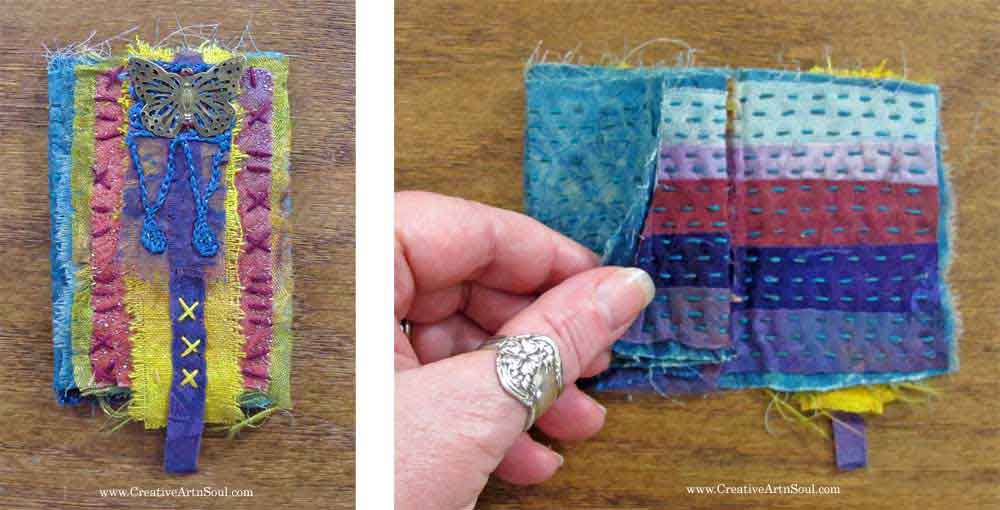
I would love to live like a river flows, carried by the surprise of its own unfolding. – John O’Donohue –
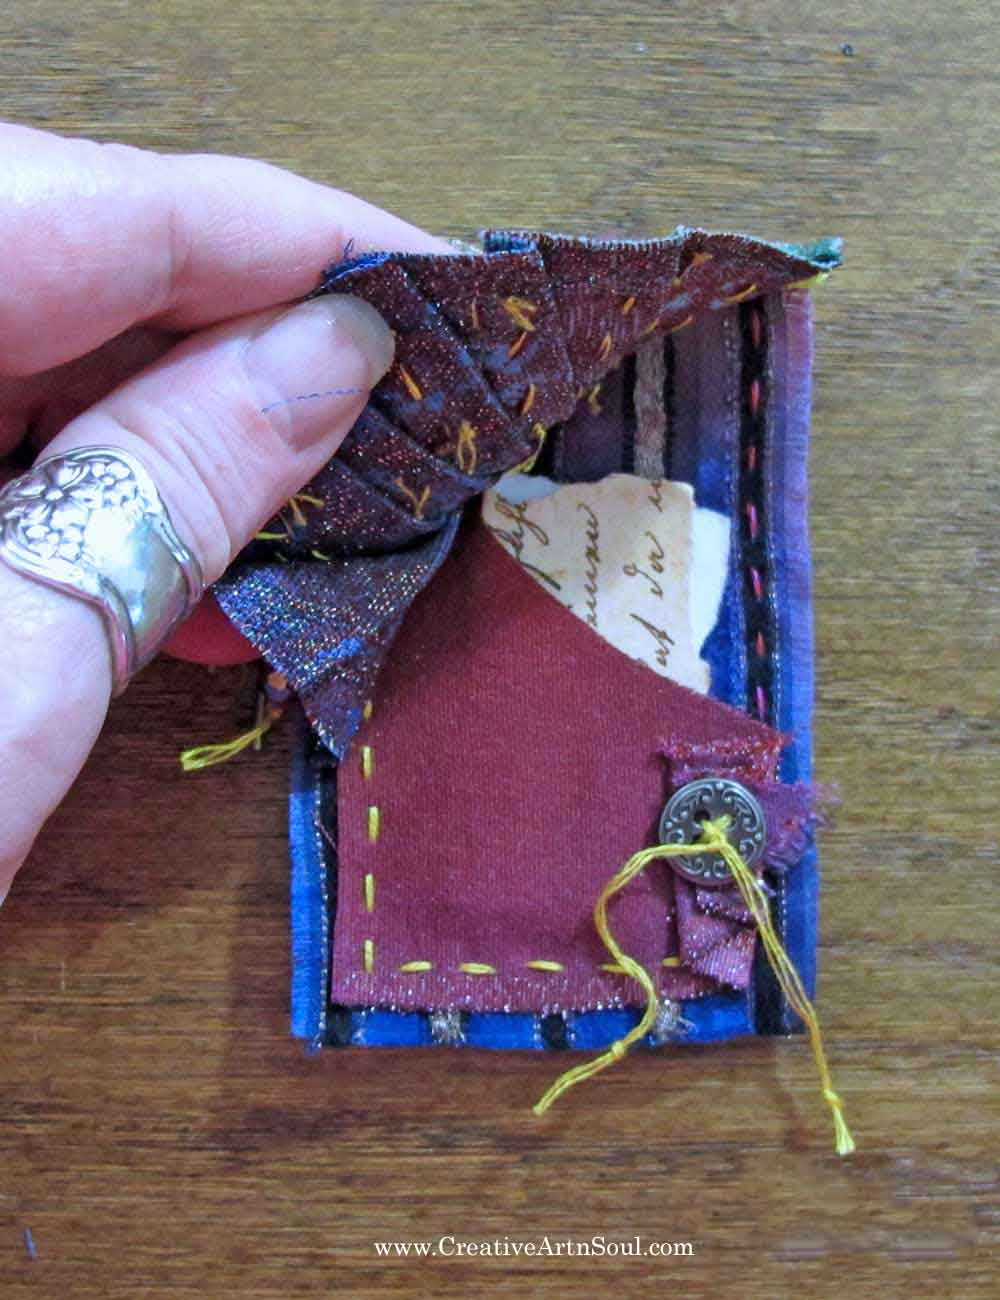
Mini-Journal: Hidden Pockets
An additional way to add words to the pages of your mini-journal is using hidden pockets.
Much in the same way as pages with secret stories, making pages with pockets also gives you a way to store written words such as favorite quotations or sayings, or even a tiny letter to yourself or someone else. Making the pocket hidden then adds a layer of mystery to the process.
In keeping with the theme of “Unfolding” I used fabric manipulation to create a little fold on the right side of the pocket held in place with a button, as well as a folded fan-shaped flap. When lifted, the flap reveals the little pocket with a hidden message.

Mini-Journal: The Story Ends

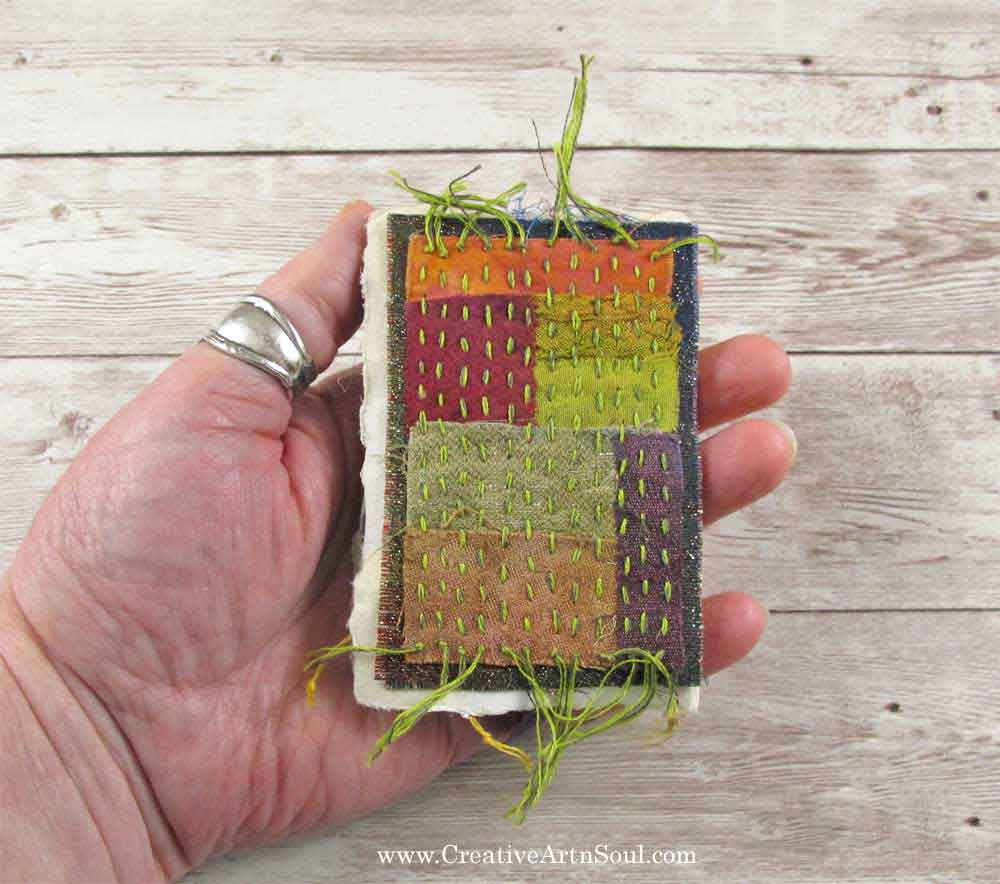
The last page of the mini-journal is where the story ends. The ending is always a time for looking back and reflecting on the journey so I like to make the last page using simple patchwork held together with a basic running stitch which requires little attention as you to stitch back and forth, row after row.
I find it to be a meditative and contemplative process and the perfect way to end the story of my mini-journal. As you are the creator of this particular story, your thoughts can wander freely about the process that has taken you from the beginning and brought you to this place where it ends.
Mini-Journal: Putting it All Together
Once all the fabric collage sections are completed, it’s now time to assemble the mini-journal.
To assemble, cut or tear a piece of paper slightly larger than the finished collages, then glue the collages in place and allow to dry.
The front and back pages
The inside pages

I always like to finish my mini-journals by wrapping them with a length of decorative fiber with little charms. This is a symbolic way to keep my story safe and treasured.

Save this pin to your favorite Pinterest board!
