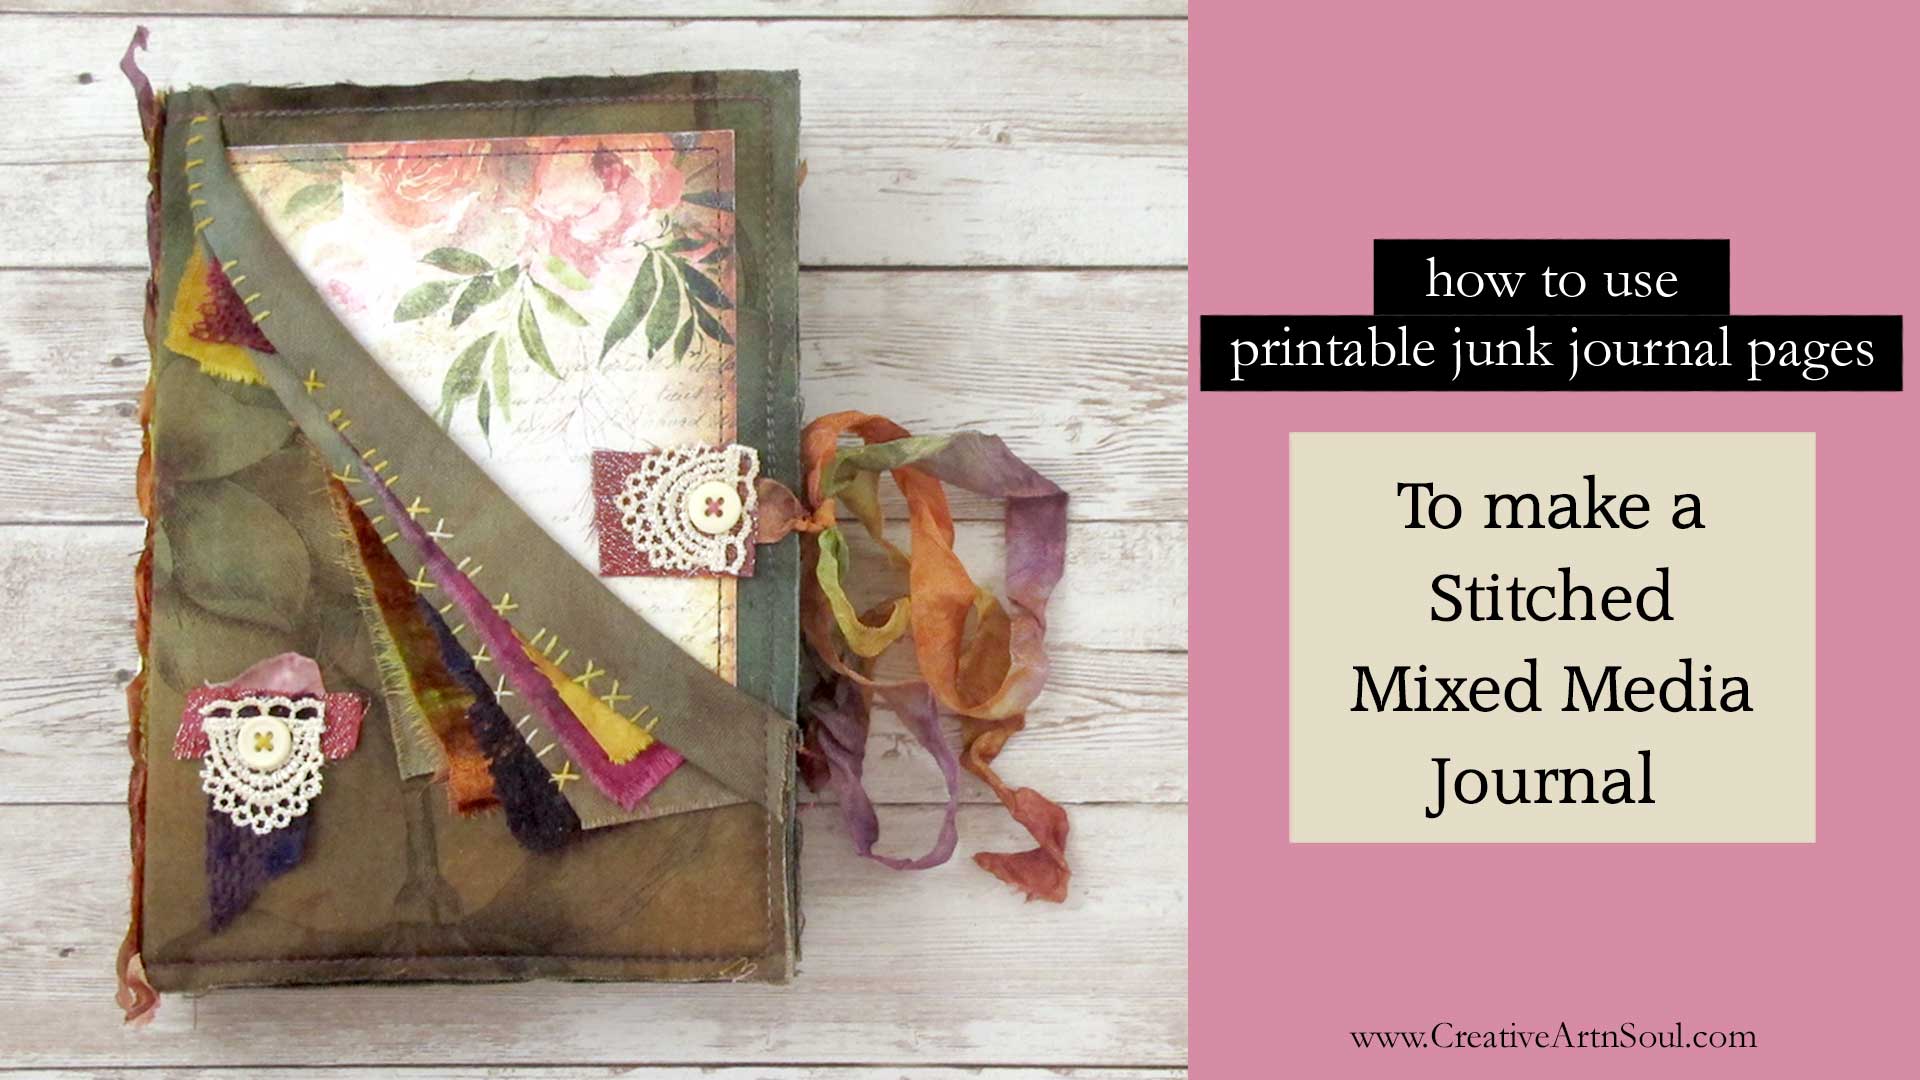
Learn how to use printable junk journal pages to make a creative and unique stitched mixed media journal.
Stitched journals are one of my favorite types of journals to make. Using fabric, stitches and other mixed media elements, you can create visually captivating collages and compositions that bring texture, depth, and visual interest, creating a multi-dimensional effect.
Although the pages in these types of journals can be made using plain or handmade papers, printable junk journal pages offers a unique alternative.
Because printable junk journal pages are readily available in an unlimited range of colors and themed designs, they offer a wellspring of inspiration and can guide the choice of embellishments for the pages.
Whether you prefer vibrant hues or muted tones, floral motifs or geometric patterns, the selection of printable pages ensures that there is something to suit every creative vision. With this inspiration as a starting point, you can let your imagination run wild, seamlessly integrating the printed elements with your own artistic additions to create truly unique and captivating compositions.
How to use Printable Junk Journal Pages to Make a Stitched Mixed Media Journal
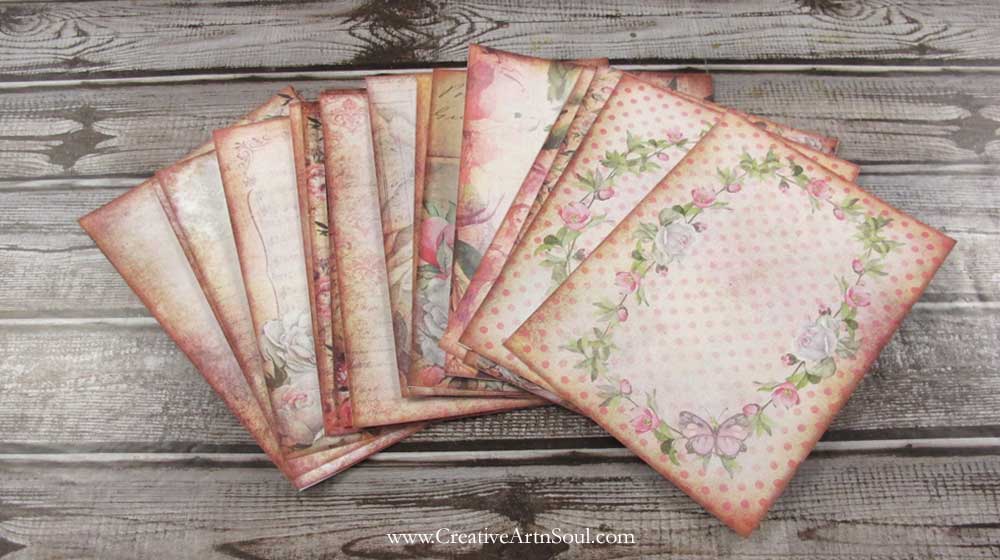
To make this journal I’ve used the Summer Garden printable journal kit which has lovely floral imagery. However you can use any printable journal kit or printable journal pages to make this type of journal.
The journal is creatively designed and features a fabric journal cover with a pocket on the front, and printable pages that are sewn together on a sewing machine.
Once assembled, the journal pages can then be creatively embellished with fabric and lace scraps, images and quotations, beads and charms, and other types of ephemera.
Supplies
- printable junk journal pages
- white cardstock 110lb or similar weight
- fabric for the journal cover
- strips of fabric or ribbon for tie closure
- fabric, lace and paper scraps
- hand embroidery needle and embroidery thread
- beads, metal charms
- fabric glue or craft strength glue stick
- Peltex 72F double-sided fusible heavyweight stabilizer or similar
- tear-away stabilizer
- sewing machine
- ruler and rotary cutter or sharp scissors
- black sharpie or felt tipped marker
- bookbinding awl or large embroidery needle
Print the Pages
To get started with your journal, you first need to print the journal pages. The pages should be printed onto cardstock, as they need to be somewhat rigid. 110lb or similar weight cardstock is ideal for this type of journal.
The printable junk journal pages that I’ve used to make this journal are sized to finish at 5″ x 7″ which is a perfect size for making a handmade journal.
The number of printable journal pages you use in your journal depends on how many signatures you include. You need four single journal pages to make one signature. In this journal I’ve included four signatures. You’ll also need two additional single journal pages for the front and back cover.
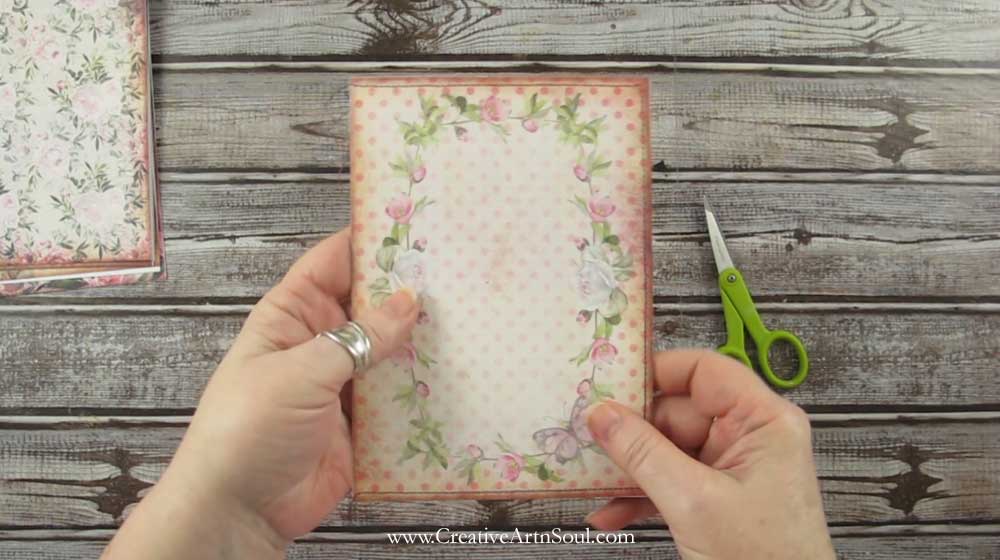
The junk journal pages should be printed on one side of each piece of cardstock. Once printed, cut the pages to size, then cut them in half.
Make the Signatures
For each signature you’ll need four single printable journal pages. Assemble two pages back to back to create one page set. Two page sets are used to make one signature.
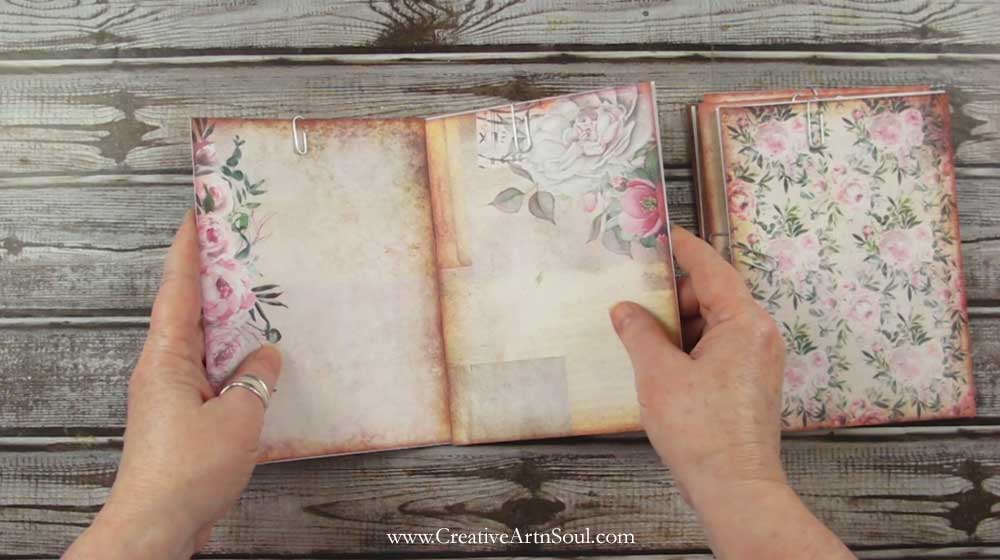
Arrange the page sets in the order that they will be inserted into your journal as signatures. Use paper clips to keep things organized.
Align the edges of each page set, and using the straight stitch on your sewing machine, sew close along the top, outer edge, and bottom of each page set. If the pages are not evenly aligned after you’ve finished sewing them, simply cut away the excess with a pair of scissors.
Once all the page sets are sewn together, it’s time to make the signatures and this is done by machine sewing strips of fabric down the center to join the pages together.
To make it easy to sew the journal pages, align the unsewn edges of each page set side by side on a flat surface, then cut some small pieces of masking tape or sticky tape and tape the pages together.

Cut or tear two strips of fabric per signature about 1″ to 1-1/2″ wide and slightly longer than the page.
Center and position one fabric strip on one side, and the other fabric strip on the other side. Run a glue stick down the center as a way to temporarily hold the fabric in place while you sew.
Once the fabric strips are positioned, machine sew them down each side and across the top and bottom. You can use a straight stitch or a zig-zag stitch or even a decorative stitch if your sewing machine has them.
Cut away the excess fabric at the top and bottom, fold the pages, and press lightly with an iron down the fabric edge to make a permanent fold.

Make the Cover
The cover for this journal is made using Peltex double sided fusible heavyweight stabilizer which is a very thick type of stabilizer that is suitable for sewing. If you are unable to get hold of Peltex you can easily make your own.
Cut one piece each for the front and back covers and one piece for the spine.
Cut the front and back pieces 1/4″ wider and longer than the pages. The pages for my journal are 7″ high by 5″ wide when folded. I’ve cut two pieces of stabilizer 7-1/4″ high by 5-1/4″ wide.
Cut the spine section 1/4″ longer than the height of the journal pages and wide enough to fit your signatures. The signatures are sewn onto the spine at 1/4″ intervals. I’m using 4 signatures so I’ve cut the spine section 1″ wide by 7-1/4″ high.

On your sewing machine, sew the front and back cover pieces to the spine section using a wide zig zag stitch. When sewing, leave a slight gap in-between the spine section and the front and back pieces which will make it easier to fold the cover.

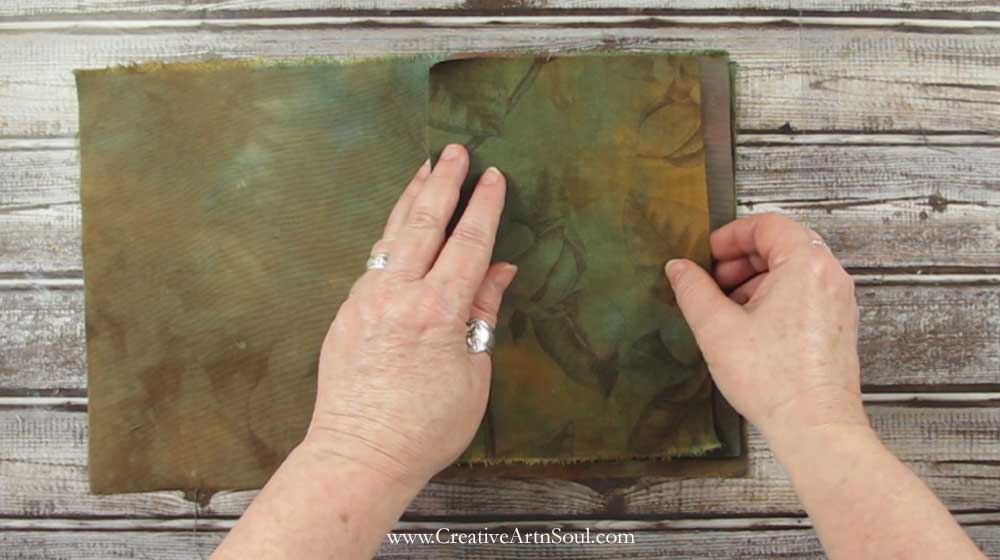
For the cover, cut one piece of fabric for the inside lining, one piece for the outside cover, and one piece for the insert that goes underneath the front cover pocket.
For the lining, cut a piece of fabric about 1″ longer in width and height than the cover.
For the outside cover, cut a piece of fabric about 3″ longer in width and 1″ longer in height than the cover. The extra fabric on the width will give you enough fabric to create the front pocket which will be manipulated into folds down the right side of the cover.
For the insert on the front that goes underneath the pocket, cut a piece of fabric the full size of the front cover plus about 1/2″ along the top, bottom and sides.
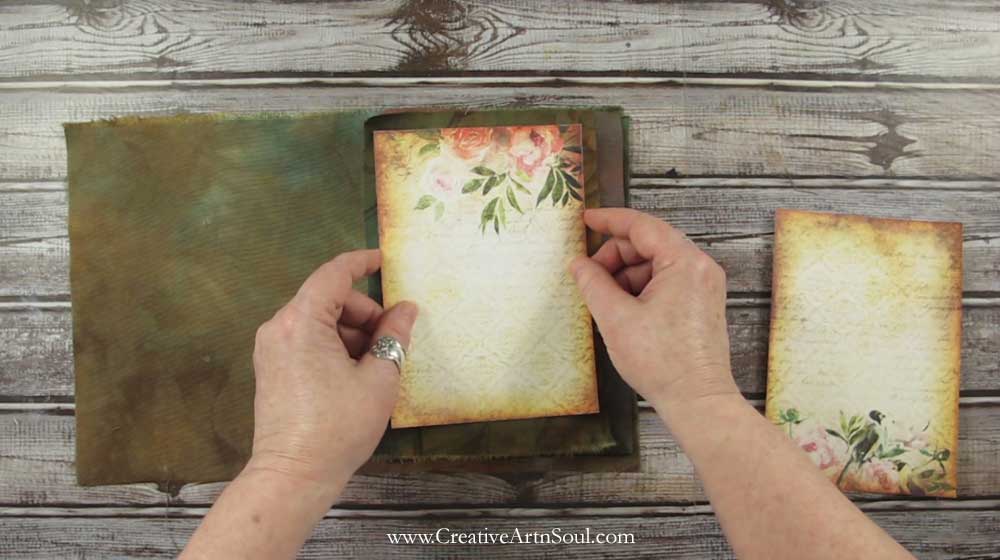
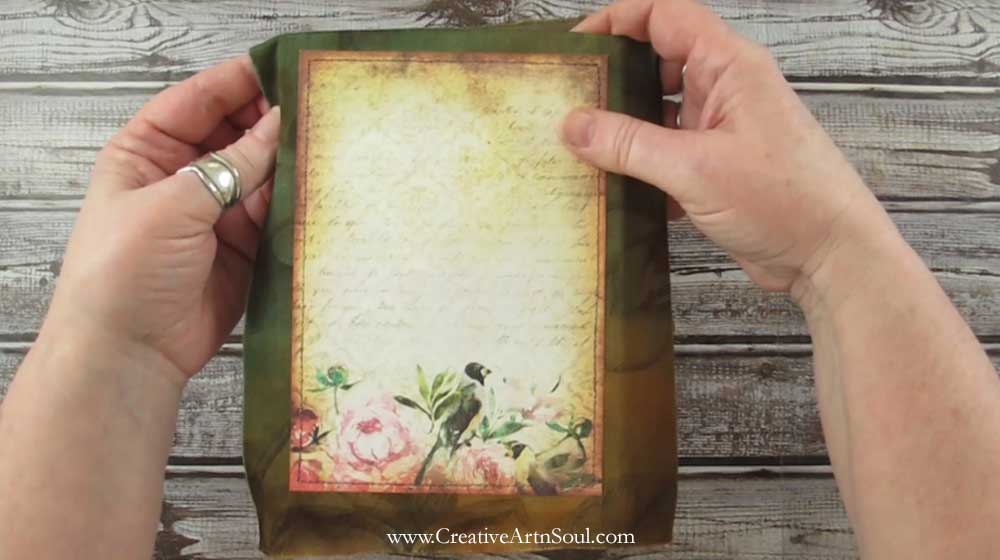
You will also need two printable junk journal pages printed onto cardstock that will be stitched to the front and back cover sections. These printables should be the same size as the page printables.
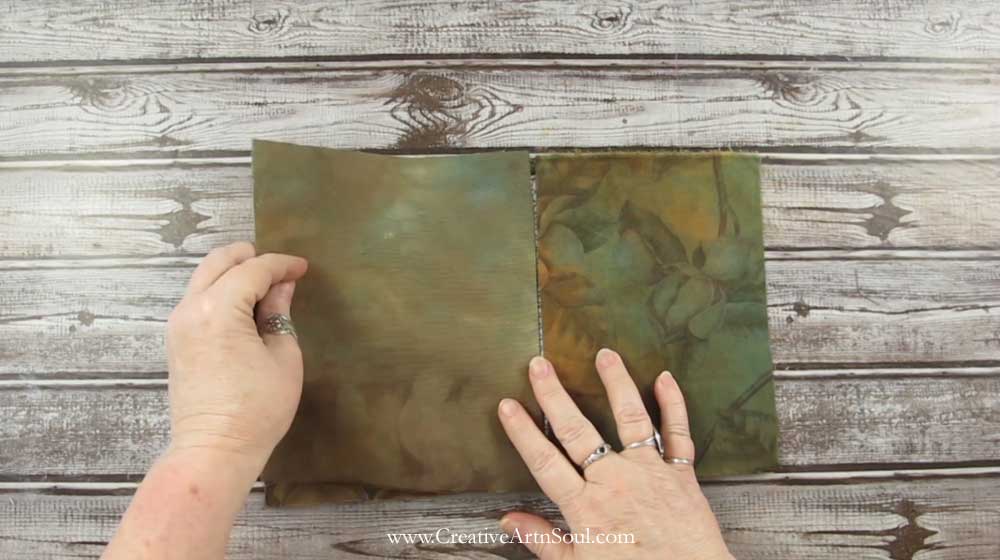
To get started assembling the cover, first position the fabric for the outside cover and iron it to the fusible interfacing along the back and the spine sections only, leaving the fabric unattached on the front section. When using fusible peltex stabilizer press the fabric for a few seconds, working section by section until the surface has been completely pressed.

Next, position the fabric insert on the outside front cover and iron in place.
The two printables will be sewn to the back cover and on top of the front cover insert. To help position the printables on the cover, you can make a crease on the fabric by running your finger nail around the edge of the stabilizer. This makes a visible crease that you can use as a guide to position the printables.

Use a glue stick to temporarily hold the printables in place then sew the them to the cover close around the edges using a straight stitch or a zig-zag stitch or even a decorative machine stitch.
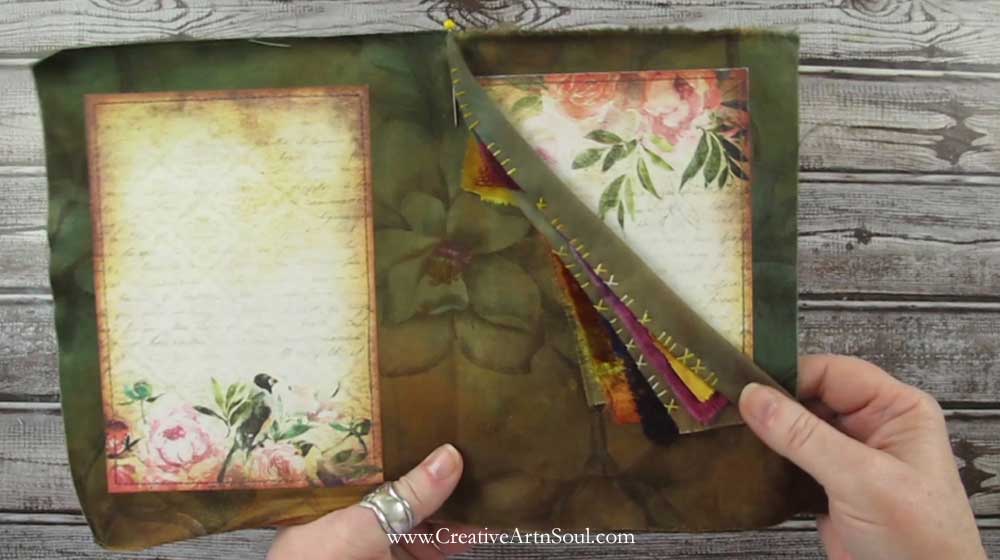
To manipulate the fabric on the front for the pocket, first pin the fabric 1/4″ in from the top left edge of the front cover. This will ensure that the edge of the printable doesn’t show.
Then play around with folding the fabric in different ways until you’re happy with the way that it looks. Fold the top right corner under and gather some pleats along the right edge. The results will look different depending on the angle that you fold under and the amount of fabric that you pleat.
There should be enough fabric for two or three pleats that create nice waves running from the top left to the bottom right. Pin the fabric in place so you can see better how this will look. There’s no right on wrong way to do this, so have fun with it.

In the end I folded the underside over to the front and created several folds. I added a few handstitches over the folds at the top to anchor them and keep them from unfolding and then began playing around by adding some scraps of fabric in between the folds to make things look a little more interesting.
Once I had the fabric scraps positioned, I hand sewed them in place.
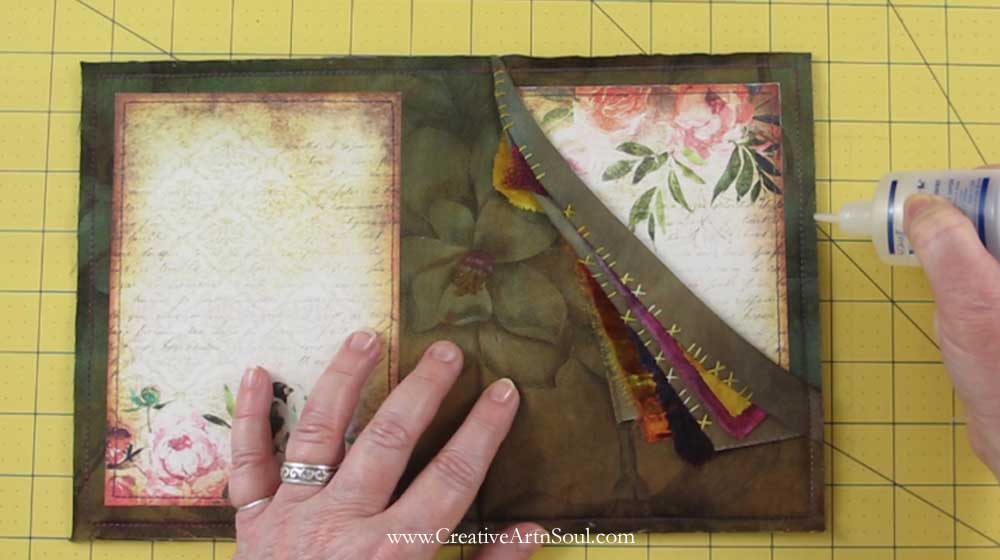
Once the front pocket section is complete, iron the lining fabric to the underside of the stabilizer.
Pin the front pocket section in place along the right side of the cover, then machine sew close around the edge of the stabilizer. When sewing, make sure to sew as close to the outside edge of the stabilizer as possible.
I like to use a stitch in the ditch machine foot because it has a center guide that makes it easy to line up against the edge of the stabilizer. However you could also use your fingernail to run along the edge to create a visible crease that you can use as a sewing guide.

After you’ve finished sewing, use a ruler and rotary cutter or a pair of sharp scissors and cut away the excess fabric from the cover about a 1/4″ away from the sewn edges.
If you’re fabric tends to fray, apply a line of Fray Check around the edge. Fray check is a lightweight fabric glue that will prevent fraying.
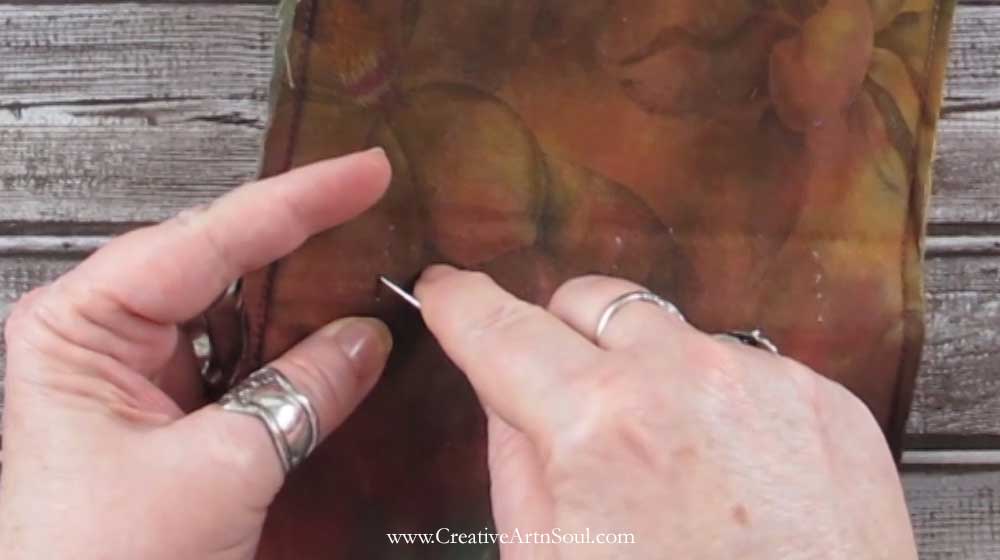
Make the Signature and Cover Hole Templates
To make it easy to sew the signatures into the cover, you’ll need to make some hole templates – one for the signatures and one for the cover. For this journal, I’ve used a 3-hole pamphlet stitch.
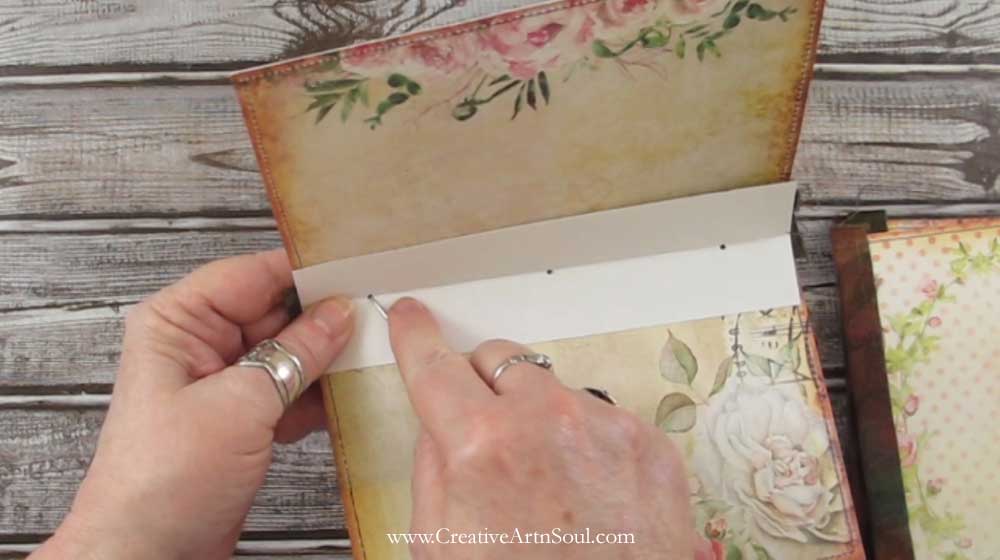
To make a signature hole template, cut a piece of paper 2″ wide by the length of the journal page. Fold in half lengthways and make a crease down the middle. Using a sharpie, mark dots 1″ in from each end, and one in the middle. Then, using an awl or a large embroidery needle, punch holes through all the dot marks.
Position the page template along the center fold of the signature, and using an awl, punch through each of the holes and through the fabric on the signatures. Do this for all the signatures.
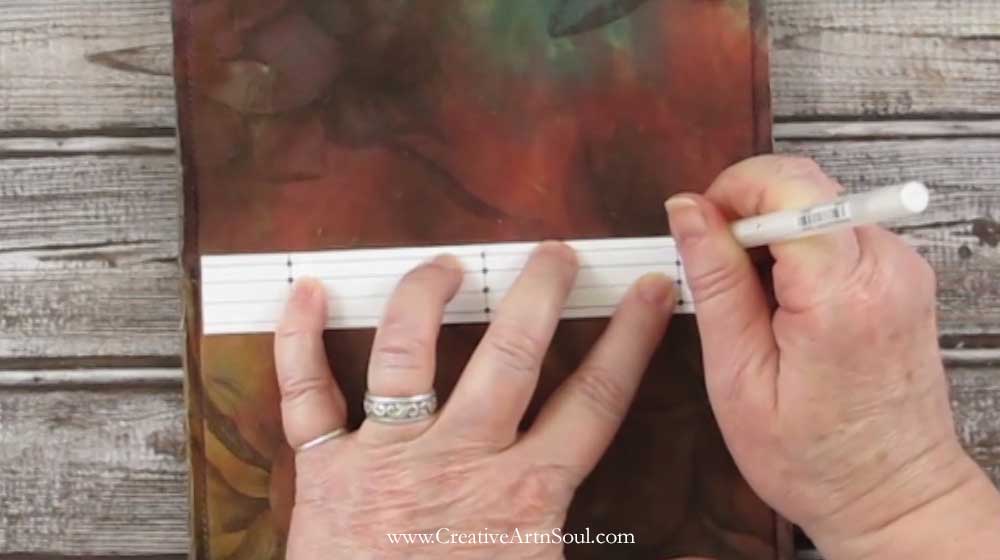
To make a cover hole template, cut a piece of paper the width of the spine on your journal by the length of the journal cover. Using a pencil, draw lines along the length of the template where the signatures will be positioned. I have four signatures and I’m going to sew the first and last signatures 1/8 of an inch in from each end, with the other two spaced approximately 1/4″ apart.
Then draw lines across the width matching the dimensions of the page template. Using a sharpie, mark dots on the template where each of the lines cross. Using an awl, punch holes through each of the dot marks.
Position the template along the spine and using a sharpie, make a mark through each of the holes onto the fabric underneath. As this fabric is dark colored, I’m using a white gel pen instead of a sharpie so I can see the markings better.
Using an awl, punch holes through all the markings on the cover spine.
Sew in the Signatures
Once all the holes are punched, it’s time to sew in the signatures.
Cut a length of strong embroidery thread or bookbinding thread about twice the length of the page and thread it through a large embroidery needle.
With the first signature positioned inside the cover, and starting with the middle hole, push the needle through the signature and through the center hole in the cover.
Leave a 3 to 4 in tail of thread inside the signature. This will be used to tie off the thread once the signature is sewn in.
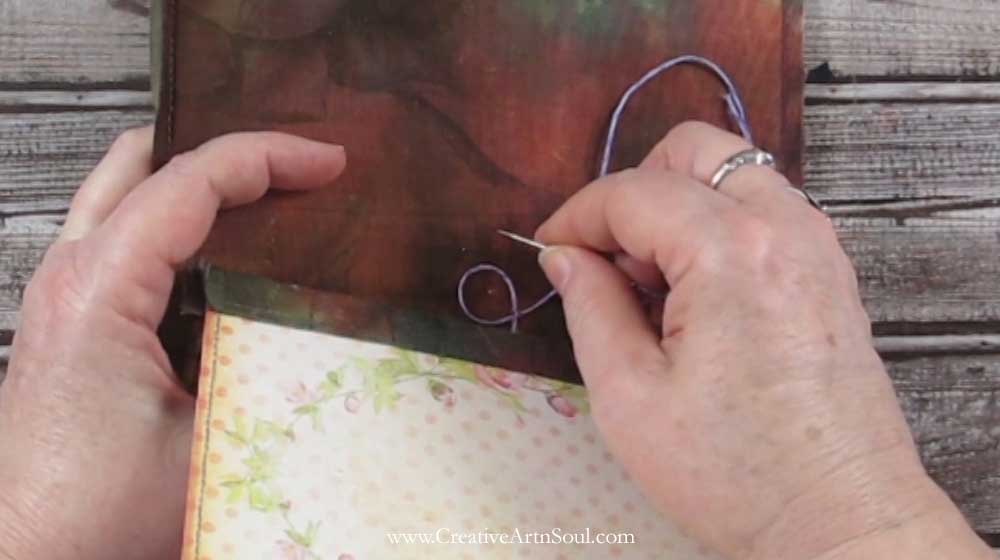
Push the needle through the next hole on the cover back to the inside and through the signature. Then back to the outside through the middle hole. Then back to the inside through the last hole.
Make sure the thread is taut, then tie the thread off in a secure knot and trim away the excess. Sew the remaining signatures into the cover in the same way.

Finish the Cover
I finished the cover by adding a fabric strip to hide the stitches on the spine.
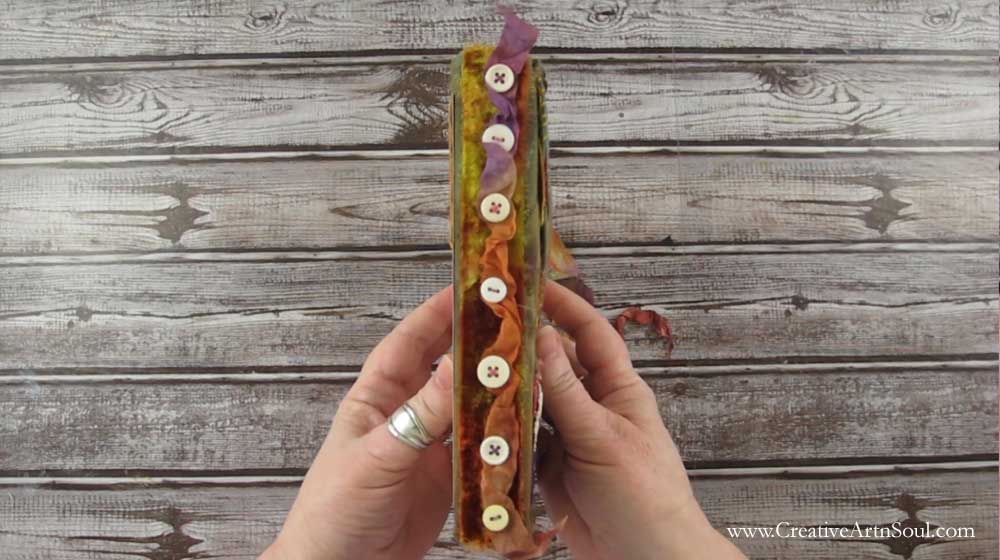
I also added a ribbon tie closure and several small fabric collages as embellishment.

Embellish the Pages
There is no right or wrong way to use or embellish the pages of your printable journal. They can be used to display images, your favorite quotations, or creative fabric collages. You can leave the pages blank, use them for journal writing, or embellish them with pockets, tags, or fabric scraps and stitches.
To create stitched collages that you can glue onto your pages, gather together some tear-away stabilizer, fabric and lace scraps, embellishments, favorite quotations, images or other ephemera. Create your collage by layering the pieces onto a backing of tearaway stabilizer.
Glue the pieces in place using a gluestick to hold them in position while you sew them together using a sewing machine or hand stitches. Once the collage is complete, glue it onto your journal page.


You can also embellish the edges of the pages with a few hand stitches or fabric tabs here and there, just to make them look interesting.

I hope you’re inspired by these ideas and use them as inspiration to make your own unique stitched mixed media journal using printable junk journal pages.
Save this pin to your favorite Pinterest board!
